How to change oil on a Volkswagen Type 4 engine
A DIY guide on changing oil on VW Type 4 engines, which power the late VW Type 2 busses, and the Porsche 914 and 912E.


The guide is geared towards a bus, but for the most part it should apply to other models and makes equipped with the same engine (VW Type 4, Porsche 912E, Porsche 914). For simplicity, and with the hobbyist with the basic toolset in mind, the bus is kept on the ground. A seasoned mechanic with access to heavier equipment would most probably lift the vehicle.
While the whole process, including oil strainer cleaning and oil filter replacement is described, they are not necessary to do at each oil change. Check the service intervals on your owner's manual to decide when you need to do these.
Materials
Consumables
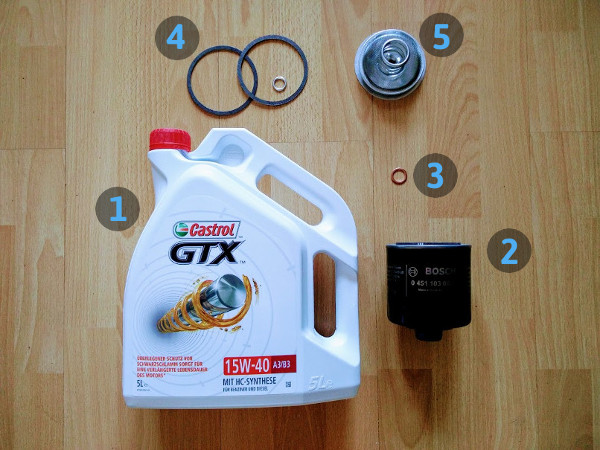
The most essential items you will need to do an oil change. Note that the picture is simply showing one brand and grade of engine oil for the sake of example, but not advocating for its use
- ✅ Engine oil
- ✅ Oil filter [021 115 351 A]
- ✅ Oil drain plug washer [N 0138492]. ID: 14mm, OD: 20mm, thickness: 1.5mm
- ✅ Oil strainer gasket set [021 198 031] (two gaskets and a crush washer)
- ⭕ Oil strainer [021 115 175] (only necessary if you can't reuse your original one)
❓ Which oil filter should I use?
💡 Unlike other procedures in your car, and perhaps except for the oil itself, the parts required for doing an oil change are cheap. Do yourself a favour and order each set more than once. It can be a lifesaver if you lose or damage any part, and it will save you postage fees for the next oil change if you ordered them online.
💡 Unless your old strainer is damaged, a new one is optional. But it can save you the time to clean the old strainer. You can then keep the old strainer, clean it in your own time, and swap them on the next oil change. Also, oil strainers are made of aluminum and thus relatively fragile, so if you happen to crush one of them, you will then have a replacement.
Tools
Essential
- ✅ Socket wrench
- ✅ Torque wrench in·ft or N·m (e.g. 6 - 30 N·m)
- ✅ 19 mm socket
- ✅ 13 mm socket
- ✅ Drain pan (min. 4 l or 1 gallon)
Good to have
- ⭕ Disposable gloves: nitrile or latex, you don't want blackened nails when you go to dinner later
- ⭕ Large paper roll: to clean parts and any mess left behind
- ⭕ Bowl or container: for oily removed/replaced parts
- ⭕ Funnel: to do the oil refill
- ⭕ Old toothbrush: to clean oil strainer
- ⭕ Carb and choke cleaner or dish soap: to clean oil strainer and plate
- ⭕ An old mat: to lie on the floor while doing the oil change
⚠ Use the torque wrench for tightening only, you do not want to overstress the torque limiting mechanism while applying lots of force. Use the regular wrench for undoing nuts and bolts.
💡 If you use lbf·ft where you are, you will be better equipped with an inch pound torque wrench for low torques such as here. Torque wrenches with a pound foot scale tend to have a wider range and are less accurate on the lower torque band.
Procedure
Drainage and cleanup
- Warm up the engine: optionally drive or run the car idle for a few of minutes to heat up the oil. It will make it less viscous to ease draining
- Find a place on level ground: it will ensure effective draining and accurate oil level check
- Chock the vehicle: use wheel chocks for safety and to prevent the vehicle from moving
- Prepare the change pan: place it underneath the drain plug
- Remove drain plug with a 19 mm socket
- Let the oil drain for some minutes
- Remove the oil strainer nut with a 13 mm socket
- Clean or replace the oil strainer: an old toothbrush works wonders here. It's also a good opportunity to inspect the old oil for particle deposits: metal filings in your strainer could mean main bearings damage and are bad news.
- Clean the strainer cover plate with dish soap
- Remove the oil filter (by hand or with tool). Move the change pan underneath the filter first.
💡 As the filter is obviously filled with oil (half a liter/quart of it), a thick black mass will start quickly dripping out of the filter as soon as you remove it from the thread. Have your oil pan ready for it underneath. If your pan is not large enough to cover all the places where oil is dripping from now (oil strainer, oil drain, oil filter holes), put the filter in another container and then pour the oil back to your pan. Alternatively, assemble the oil strainer and drain plug first, and then undo the filter.
💡 When removing the oil strainer nut, you will notice the old crush washer will be firmly attached to it. Use a thin knife or metal plate to pry it out and then replace it with the new washer.
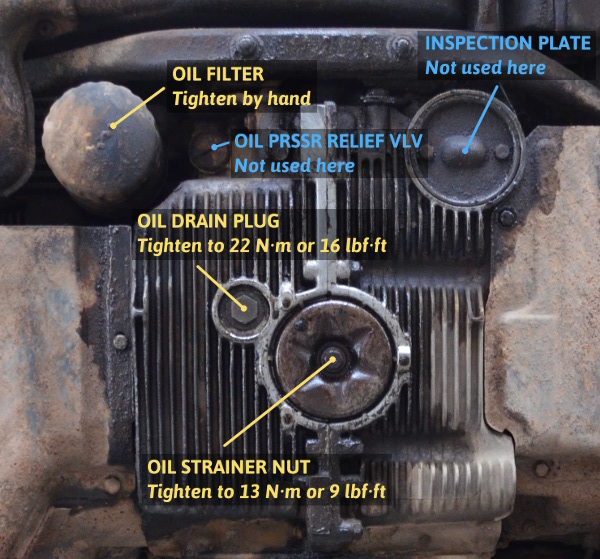
❓ What is the inspection plate?
❓ What is the oil pressure relief valve?
Assembly
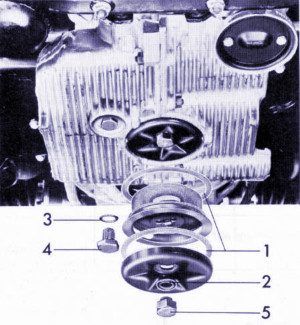
- Drain plug: use a new copper washer [3] and tighten the drain plug [4] with a 19 mm socket at 22 Nm (16 lbf·ft)
- Oil strainer: use a new gasket set [1] and crush washer [2], tighten the nut [5] with a 13 mm socket at 10-13 N·m (7-9 lbf·ft)
- Oil filter: coat its rubber seal with engine oil and install the oil filter hand tightening it.
⚠ Do not overtighten the oil strainer nut. This is probably the most important thing you need to watch out for while doing the oil change: you can break the engine case otherwise. Keep to the torque spec of max 13 N·m or 9 lbf·ft. Do yourself a favour and get a torque wrench. If you are however in the middle of nowhere only armed with a regular socket wrench and sticks and stones, get it tight and then a tiny bit more.
💡 Fitting the oil strainer and the two sandwiched gaskets while lying on the floor on a tight space and trying to keep it level is not everyone's idea of fun. An easier way is to attach the gaskets to the strainer so you are dealing with only one part. Glue them up with something that's oil and temperature resistant and that's easy to remove next time you need to replace the gaskets. I use Hylomar M (non-setting gasket compound) as it was what I happened to have at hand last time. I've heard of other folks using grease for instance. Your mileage might vary.
💡 In a pinch, if you do not have a new copper washer for the drain plug, you can anneal the old one by heating it with a propane torch after removal. This will soften and expand the metal, preparing it for a fresh crush.
Refill
- Refill: open the oil filler and refill with oil to the required capacity
- Check level: check the oil level on the dipstick (no need to wait for it to settle, as you've only filled the sump). At this point it might seem high, but particularly if you've changed the filter, which will be filled with half a quart (liter) once you start the engine.
- Don't be that guy: ⚠ Put the the oil filler cap back on before driving away.
- Start: start the engine, and check that the oil pressure warning light goes out after a few seconds as expected.
- Inspect: check for leaks and address them if necessary –e.g. retighten the filter.
Once you're done, remember to bring the old oil to the nearest recycling center for safe disposal.
⚠ If you forget to put the oil cap back on, you will be creating a vacuum leak in the crankcase. The oil filler is not part of the oil circuit, so the oil pressure will not be affected. But other than potentially adding contaminants to the sump (e.g. you've been driving offroad with the cap off), the main issue is the vacuum leak, which won't allow the engine to run well. Particularly in fuel-injected engines, you will be introducing unmetered air to the intake, the symptom of which is a poor idle, generally stalling the engine.
💡 While checking for leaks, you might want to put a cardboard on the floor underneath the engine. This will help you see the most obvious leaks, particularly if some oil was already spilled on the floor during the change.
ℹ There seems to be one school of thought that favours prefilling the filter before fitting it in, as opposed to fitting it dry. As described in Tom Wilson's "How to rebuild your Volkswagen air-cooled engine", pp148, the idea behind it is to speed priming at engine start. YMMV.
Reference
Service interval
TBD
Torques
| Bolt / nut | Torque (N·m) | Torque (lbf·ft) | Socket size (mm) |
|---|---|---|---|
| Drain plug bolt | 22 | 16 | 19 |
| Strainer nut | 13 | 9 | 13 |
Capacities
| Engine oil sump | Max. capacity (l) | Max. capacity (U.S. qt) | Max. capacity (Imp. qt) |
|---|---|---|---|
| - with filter change | 3.5 | 3.7 | 3.1 |
| - w/o filter change | 3.0 | 3.2 | 2.6 |
FAQ
Which oil should I use?
Ah, you've happened to reach a very hot topic, and outside of the scope of this guide.
Folks with more expertise than I have been discussing this at length, so I'll just point you to that conversation and some other resources to make your own decision. For instance, this website, despite the "welcome to the 90s" look goes into the concepts related to oil characteristics and usage in a very concise and clear way.
TL;DR:
- Use a multi-grade oil with at least API Service Classification SE or higher (current is SN). Then,
- decide on mineral vs. synthetic, then
- decide on its grade (thin vs. thick) depending on the age of your engine and the area where you'll be driving it.
I myself ended up picking up the same grade the previous owner had been running the bus with for the last 10 years.
Which oil filter should I use?
Just get one of the OEM ones for VW's 021115351A:
- Mann W920/17 filter
- Mahle OC 28 filter
- Bosch 0 451 103 084 (or P3084) filter
From what I gather, some folks in the US also recommend the NAPA Gold 1521 or the WIX 51521.
ℹ Note that only Mann and Mahle seem to be doing their own filters. All of the rest outsource fabrication to one of a set of companies. Often the same filter manufacturer delivers filters to different companies. While not exactly for the same filter model, if you want to learn more about oil filter manufacturing, their quality and more, you can check out this great comparison of German (read for VWs) oil filters
What is the inspection plate?
While not used for an oil change, in case you are wondering about the inspection plate hole, its main purpose in a bus is to house an engine heater, used in cold climates to pre-heat the oil to ease engine start.
In Type 4 engines on other vehicles such as the Porsche 914, it used to house the oil temperature sensor, with a modified plate and cover often referred to as the taco plate for its supposed resemblance to a taco. As such, some bus owners use that location with either a modified aftermarket or an original Porsche taco plate to mount their oil temperature senders.
Regardless of its name, very little inspection, if at all, can be made from the inspection plate.
What is the oil pressure relief valve?
Also not used for an oil change, you might have noticed the big screw for the oil pressure relief valve. The valve effectively controls the flow of oil depending on its temperature, e.g. allowing it to bypass the cooler on startup.
To better understand this, I recommend reading the Lubrication notes from the IAC forum and the Dual Relief Oiling System post on the Samba forum.
Learn more
Here's a collection of great external resources for further reading or watching on the subjects of oil change and selection.
- Changing the engine oil, from the 1979 VW Type 2 Owner's Manual
- Oil change, by Sean Bartnik
- Oil selection, by Richard Atwell
- Engine oil service categories from the American Petroleum Institute (API)